Cooking over a campfire is a timeless tradition that connects us with nature and our primal instincts. Mastering campfire grill techniques can elevate your outdoor cooking experience and create memorable meals for you and your companions. This article will provide essential tips and tricks to help you become a campfire grilling pro, from setting up your grill to achieving the perfect flavor and doneness.
Table of Contents
Setting Up Your Campfire Grill
1. Choose the right location
Select a level spot away from low-hanging branches, dry grass, and other flammable materials. Ensure proper ventilation and adhere to local fire regulations and campground rules. When choosing a location, be mindful of the Leave No Trace principles to minimize your impact on the environment.
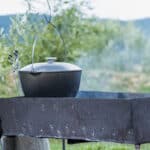
2. Build your fire
Use dry, seasoned hardwood for a long-lasting, flavorful fire. Start with kindling and gradually add larger logs, allowing the fire to build and create a bed of hot coals. A well-built fire is the foundation of successful campfire grilling.
3. Prepare your grill
Use a collapsible grate or a hovering grate designed for campfire cooking. Position the grate over the fire, ensuring stability and adjusting the height as needed. Having the right campfire cooking equipment is essential for a smooth and enjoyable grilling experience.
Mastering the Flame
Preheat your grill
Allow the grate to heat up before placing food on it, ensuring even cooking and preventing sticking. Preheat for about 10-15 minutes with the grate in place to reach the desired temperature. A properly preheated grill will give you better results and more consistent cooking.
Create heat zones
Arrange the coals to create different heat zones for versatile cooking options. Use direct heat for searing and achieving grill marks, and indirect heat for slower cooking or keeping food warm. This technique allows you to cook different types of food simultaneously and achieve the perfect doneness for each item.
Control the temperature
Adjust the height of the grate or the placement of coals to regulate the heat. Use a thermometer or the hand test (holding your hand above the grate) to gauge the temperature and avoid overcooking. Mastering temperature control is key to achieving perfectly grilled meals.
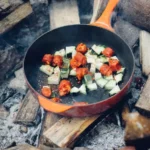
Enhancing Flavor and Texture
Marinate and season
Use marinades to tenderize and infuse flavors into your meats and vegetables. Season your food with salt, pepper, and your favorite herbs and spices for added depth and complexity. Experimenting with different marinades and seasonings will help you create unique and memorable flavors.
Oil the grate
Lightly oil the grate before placing food on it to prevent sticking and ensure easy flipping and removal. Use a high smoke point oil like canola or vegetable oil and apply it with a brush or spray bottle. This simple step will make your grilling experience much more enjoyable and stress-free.
Experiment with wood smoke
Add wood chips or chunks to your fire for a unique smoky flavor. Soak the wood in water for 30 minutes before adding it to the fire to create more smoke and prevent rapid burning. Different types of wood will impart different flavors, so don’t be afraid to experiment and find your favorite combinations.
Conclusion
Mastering campfire grill techniques is an art that requires practice, patience, and a willingness to experiment. By following these tips and tricks, you’ll be well on your way to creating unforgettable outdoor meals that will impress your friends and family.
Remember to always prioritize safety, respect the environment, and enjoy the primal connection to nature that campfire cooking provides. With a little practice and a lot of passion, you’ll soon become a campfire grilling master, creating delicious memories one meal at a time.


Leave a Reply