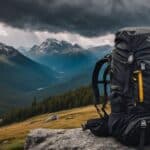
Packing a backpack for a long hike can sometimes feel like solving a complex puzzle. Each item’s placement affects your comfort and stability on the trail. This post’ll guide you through organizing your gear effectively, ensuring everything you need is at hand without overloading.
Ready to pack smart? Let’s dive in!
Table of Contents
- Understanding Your Backpack’s Design
- Avoiding Overpacking
- The Packing Process
- Packing for Convenience and Comfort
- Utilizing Packing Systems and Tools
- Preparing Your Backpack for Weather Changes
- How to Hoist Your Loaded Backpack
- Should I Pack Differently for Backcountry Camping Compared to Long-Distance Hiking?
- Conclusion
Key Takeaways
- Use specialized compartments in your backpack for organized gear placement, with heavier items close to your back and frequently needed items accessible from the top or side pockets.
- Balance your load by evenly distributing weight and using compression straps to secure bulky items, keeping them compact and stable during movement.
- Select essential gear that serves multiple purposes or is vital for survival, avoiding ‘just-in-case’ items to prevent overpacking and unnecessary strain on long hikes.
- Categorize belongings into bottom-of-pack items (like sleeping bags), core-of-pack (such as food stash), and top-of-pack essentials (including first aid kit) for strategic packing.
- Prepare for weather changes by waterproofing with rain covers and water-resistant sacks while mastering the lifting technique of a fully loaded backpack to save energy.
Understanding Your Backpack’s Design
When preparing for a long hike, recognizing the design features of your backpack is critical; each component, from pockets to straps, serves a unique purpose that can enhance your trekking experience.
This foundation will streamline your gear organization and improve overall weight distribution, ensuring you’re well-equipped for the journey ahead.
Different Pockets on Your Backpack
Your backpack is a trove of specialized compartments, each designed for specific items and purposes. The top lid of your pack often holds gear you’ll need quick access to; think rain jacket or map.
Hip belt pockets are perfect for small essentials like lip balm and trail snacks, letting you munch on the go without stopping. Front pouches keep less-needed items secure but reachable—perhaps a spare pair of socks or an insulated jacket.
Side pockets are generally tailored for water bottles or compact tripods, ensuring hydration is always at arm’s length. Efficient use of these spaces means less time digging through your bag and more time enjoying the trek.
Gear organization isn’t just about neatness—it’s about having what you need, when needed, in the most convenient spots possible. Now, let us delve deeper into the key roles played by various straps on your backpack, enhancing comfort and load management as you hike through rugged terrains.
The Purpose of Various Straps
Straps on a backpack are like the unsung heroes of any hiking trip. They serve a vital function by compressing gear tightly against your pack, which improves balance and comfort as you tackle trails.
Use compression straps to squish down bulky items such as sleeping bags or puffy jackets, making them more manageable and freeing up space inside your backpack. This ensures everything stays compact and minimizes any disruptive shifting that can throw off your center of gravity.
The customization doesn’t stop there—straps are key in adjusting your pack to fit just right. Waist belts help distribute the weight onto your hips, taking the strain off the shoulders for those long treks through backcountry terrain.
Hikers rely on webbing and adjusters to fine-tune their load before hitting the trail, ensuring that each step is stable and secure. Some straps even have dual purposes: they’re handy for lashing extra equipment externally, such as trekking poles or a sleeping pad, allowing quick access without digging through your main compartment every time you need something.
Avoiding Overpacking
Avoiding overpacking is about balancing being prepared and staying agile on the trail; every extra ounce can feel like a burden after miles of hiking. Focus on packing what you need for safety, sustenance, and shelter without succumbing to the temptation of ‘just-in-case’ items that add unnecessary weight.
Essentials Only
Packing for a long-distance hike means sticking to the bare necessities. Your backpack should include items that ensure safety, sustenance, and shelter; think a reliable water filter, food storage system, versatile first aid kit, and bear canister for animal-rich areas.
Essentials serve dual purposes or are critical for survival – extra gadgets and luxuries will only weigh you down.
Include camp clothes that can be layered to adapt to changing temperatures without taking up too much space. Make sure your insect repellent is easily accessible alongside your hydration reservoir to stay energized and protected on the trail.
A light pack liner keeps everything dry, while a rain cover shields your gear from sudden downpours. It’s about balancing what you truly need versus what you can do without – never sacrificing safety or comfort in favor of shaving off a few ounces.
Layering
Having identified the essentials, consider the art of layering items within your backpack to maintain balance and accessibility. Begin with compressible items like puff jackets or camp shoes, which can fill gaps around firmer gear without adding much weight.
This strategy ensures a snug fit that keeps everything tightly packed and reduces shifting during movement.
For pieces you might need on short notice, such as rain gear or snacks, utilize external pockets for easy reachability. Water-resistant compression sacks organize your backpack and protect sensitive equipment from moisture—crucial when facing unexpected downpours on the trail.
Remember to distribute heavier items close to your back evenly; this helps maintain stability and can prevent back strain over long distances in the wilderness.
The Packing Process
Mastering the packing process is key to a successful long-distance hike; it’s about balance, accessibility, and strategic gear placement within your backpack. Get this step right, and you’ll enjoy a more efficient trek with everything you need neatly stowed yet readily available on the trail.
Bottom-of-Pack Items
Packing the bottom of your backpack correctly lays a stable foundation for your entire load. It’s where you should stash items that you won’t need until setting up camp.
- Place your sleeping bag at the very bottom; use a compression sack to minimize its volume.
- Tuck in a sleeping pad next unless it attaches externally; this provides structure.
- Stash your extra clothing layers beneath the sleeping pad; rolling shirts and pants saves space.
- Position your tent body and rainfly around the sides if there’s room; otherwise, secure them outside.
- Include a lightweight camping pillow or stuff a pillowcase with clothes for dual use.
- Pack cold weather gear like insulated jackets deep since they’re seldom needed during the day.
Core-of-Pack Items
Now that you’ve placed lighter items at the bottom, it’s time to focus on arranging your core-of-pack items. These are typically heavier and more dense, providing stability and balance in your backpack. Strategic packing here is critical for managing weight distribution, which should sit close to your mid-back for optimal comfort during long-distance hikes.
- Place your heaviest gear, such as cooking equipment or a food stash, right above the bottom layer. Make sure these sit against the part of the pack that will be nearest to your back.
- Nestle your tent (poles and stakes can be slid alongside) in the center. This gives it protection from external pressures and reduces shifting while you’re on the move.
- Tuck in a bear canister with food if required by regulations in the area you’re hiking through. Its rigid structure also helps maintain pack shape.
- Include a hydration reservoir if there isn’t one built into your backpack. Positioning it centrally helps keep its weight close to your back and avoids any discomfort from water sloshing around.
- Stow away extra layers of clothing around these items, filling gaps for snug packing without wasting space. Layers come in handy when facing changing weather conditions.
- Wrap breakable or sensitive items like electronics or stoves with soft goods for added protection.
Top-of-Pack Items
Packing the top of your backpack requires careful thought to keep essential items readily accessible. You’ll want to reach these without having to dig through the rest of your gear, especially when you’re on the move.
- Snacks and Energy Food: Place trail mix, energy bars, and snacks in the top compartment for quick fuel stops. Having these within easy reach helps you maintain energy levels without interrupting your hike.
- First Aid Kit: Your first aid supplies should go on top for immediate accessibility in case of emergencies. Ensure it’s well-stocked but compact so it doesn’t take up too much space.
- Light Rain Jacket or Poncho: Keep a lightweight rain jacket or poncho close at hand. Sudden weather changes call for swift action to stay dry.
- Map and Compass/GPS: Essential navigation tools like a map and compass or a GPS device belong on top. Quick access is crucial when navigating unfamiliar trails.
- Sunglasses and Sunscreen: Protect yourself from the sun’s harmful rays by keeping sunglasses and sunscreen near the top so you can reapply as needed.
- Insect Repellent: Store insect repellent on top to combat bugs swiftly as they become bothersome.
- Headlamp or Flashlight (with Extra Batteries): Prepare for dusk or unexpected dark conditions by having your lighting source and spare batteries within arm’s reach.
Accessory Pockets
Accessory pockets are the small compartments on your backpack designed for organizing and quickly accessing essential items. They play a critical role in making sure your gear is neatly stowed and easy to reach when needed.
- Identify the items you use most often, such as maps, snacks, or a compass, and assign them to the accessory pockets.
- Make use of zipper pockets on your hip belt for items you’ll need without having to remove your pack, like lip balm or a pocket knife.
- Store a compact first aid kit within an outer pocket; this ensures you can grab it fast in case of emergency.
- Keep a flashlight or headlamp and spare batteries in an easily reachable pocket so that darkness won’t catch you unprepared.
- Allocate a specific pocket for waste and wrappers to maintain cleanliness and leave no trace as you hike.
- Consider attaching a carabiner to an external loop on your backpack as an additional hanging point for hats or gloves.
- Use the pockets on the shoulder straps for small items like energy gels or breath mints that you might want while on the move.
- If your backpack has them, utilize built-in waterproof pockets to protect electronics or important documents from moisture.
Packing for Convenience and Comfort
Mastering the art of efficient packing ensures that every item in your backpack serves a purpose without sacrificing comfort or accessibility on the trail, inviting you to keep reading and discover how to strike the perfect balance for your next adventure.
Internal Packing Zones
Organize your backpack smartly by using internal packing zones. Start with the bottom zone; here’s where you put your sleeping bag, pad, and camp clothes. These bulky midweight items won’t weigh you down during the hike since they rest at the base of your pack.
Move up to the middle back area, which is prime real estate for heavy gear like a tent body or stove. These should be snug against your spine to maintain balance and stability.
In front of those heavier items, pack lightweight options such as extra clothing layers or a small towel. It’s essential these bits don’t add much weight but still fill gaps between denser equipment to prevent shifting.
Lastly, cap off with top-of-pack essentials — think first aid kit, snacks, or sunscreen — that you’ll need access to throughout the day without digging deep into your pack’s abyss.
By adhering to this structure, backpackers can ensure comfort on their multi-day hiking adventure without sacrificing accessibility or mobility.
Additional Packing Areas
Transferring gear from internal compartments to additional packing areas can enhance accessibility and balance. Your backpack’s external hooks, pockets, and loops offer extra space for items you may need to grab quickly.
Utilize the hip belt pocket for snacks or a small camera; lash trekking poles or a tent to your pack’s sides using tool loops; and slide water bottles into side mesh pockets. Optimize every inch of your daypack by attaching gear externally—such as roll mats or tripods—to free up valuable space inside.
Maximizing these external storage zones allows backpackers to distribute weight evenly across their pack. Secure bulky items under the haul loop at the top for easy lifting during breaks in your thru-hiking adventure.
The bum bag is another excellent resource for stowing essentials like maps, sunscreen, or headlamps within arm’s reach. Use carabiners to clip sandals or wet clothing outside your pack as they dry while you walk, ensuring that all gear serves its purpose without compromising on comfort during long-distance hikes.
Utilizing Packing Systems and Tools
Incorporating specialized packing systems and tools can significantly streamline the process of organizing your gear, allowing you to maximize space and access essentials with ease—discover how these innovations can enhance your long-distance hiking experience in our full discussion.
Compression Sacks
Compression sacks are a hiker’s best friend when you’re looking to maximize space in your backpack. They work by squeezing the air out of soft items like clothes and sleeping bags, making them more compact and easier to fit into tight spaces.
Imagine slipping your bulky winter jacket into one of these sacks and watching it shrink down, small enough to tuck away neatly. This tool is essential for ultralight hiking, as every ounce saved is critical on long treks.
Use water-resistant compression sacks to shield important gear from rain inside your pack. However, try not to overuse them for items that need air circulation or can be damaged from constant pressure, such as a sleeping bag with natural loft – its insulation could degrade if kept compressed too long.
Think smart about how you pack a backpack; optimize space without compromising the condition of your essentials by strategically using compression sacks where they serve you best.
Tool Loops and Lash-On Points
Maximize the space inside your backpack by attaching gear to the outside using tool loops and lash-on points. These features are perfect for securing bulky items like trekking poles, tent poles, or a climbing rope that you need quick access to or that won’t fit inside your pack.
Make sure these items are strapped in tightly; loose gear can throw off your balance or get lost on the trail.
Use every loop and point to distribute weight evenly across your backpack. This smart packing strategy enhances comfort and improves stability during long-distance hikes.
For instance, fasten heavier tools lower down on the pack to keep the center of gravity optimal for walking posture. Lighter items should be lashed higher up or toward the sides. Organizing equipment in this way ensures safety and efficiency while traversing challenging terrains with all your essential hiking tools at hand.
Preparing Your Backpack for Weather Changes
Ensuring your backpack is ready to handle unexpected weather shifts can make all the difference on the trail; discover key strategies for maintaining gear dryness and comfort, no matter what Mother Nature throws your way.
Backpack Rain Cover
A backpack rain cover is a hiker’s shield against the unpredictable weather on long-distance trails. This essential item snugly fits over your backpack, keeping your gear dry during downpours.
Not only does it offer protection from rain, but it also prevents mud and dirt from soiling your pack. It’s lightweight, easy to store in an accessory pocket or lash onto the outside of your pack, ready to deploy at the first sign of rain.
Selecting a cover that fits correctly ensures maximum defense against moisture; too loose and wind can whip it off, too tight and it might not cover everything securely. Pair this with water-resistant compression sacks inside your pack for added peace of mind that no matter how heavy the heavens open up, you’ve taken steps to keep everything inside dry as bone.
Next up, let’s explore how waterproofing methods can add another layer of security for all seasons.
Waterproofing Your Pack
Keep your gear dry by waterproofing your pack before you hit the trail. Use a specialized backpack rain cover for an effective shield against downpours. These covers are lightweight, easy to slip over your pack and provide a solid barrier against moisture.
Consider water-resistant compression sacks to organize and safeguard your belongings for added protection. They minimize the space taken up by clothes and sleeping bags and block out water.
Line the inside of your backpack with a heavy-duty plastic trash bag as another layer of defense. This simple hack traps air and provides buoyancy in case you need to ford streams or encounter deep puddles.
Secure electronic devices and sensitive items in sealable plastic bags for double security—they’ll remain functional even if everything else gets soaked. With these safeguards, rest assured that a sudden cloudburst won’t soak through your essentials on long-distance hikes.
How to Hoist Your Loaded Backpack
Mastering the technique of lifting a heavy backpack can save your energy on the trail. Practice these steps at home to make your start on the hiking day smoother and easier.
- Stand by your pack, bending your knees while keeping your back straight to avoid straining.
- Place one foot slightly in front of the other for stability as you lift.
- Grab the backpack’s top loop with one hand; use the other to hold onto the back panel or frame.
- Lift the backpack onto one knee carefully, using it as a platform to support the weight.
- Slide your arm through one shoulder strap until it sits snugly on your shoulder.
- Lean forward and swing the pack gently onto your back while guiding your other arm through its strap.
- Adjust both shoulder straps evenly to ensure they’re not twisted, and sit comfortably on your shoulders.
- Clip and secure the hip belt around your waist, making sure it’s tight enough to transfer some weight off your shoulders.
- Tighten any load adjuster straps near where the shoulder straps meet the top of the backpack—this brings the weight closer to your body for better stability.
- Give a quick pat down along all straps once more before hitting the trail, confirming that everything is in place for optimal comfort.
Should I Pack Differently for Backcountry Camping Compared to Long-Distance Hiking?
When planning for backcountry camping, it’s essential to consider the weight of your pack and the duration of your trip. Unlike long-distance hiking, backcountry camping requires packing extra gear such as a tent, sleeping bag, and cooking equipment. It’s important to prioritize necessities and pack accordingly for your adventure.
Conclusion
Preparing your backpack for a long hike sets the stage for an incredible adventure. Every item has its place, ensuring both balance and accessibility. Embrace these packing strategies to make your journey smoother and more enjoyable.
Remember, efficiency on the trail starts with how well you pack at home. Hit the trails confidently, knowing your gear is stowed perfectly for whatever lies ahead.
Leave a Reply